This blog post is about our current EV3 robot we're planning to use in the 2023/2024 FLL competition. Some features: 2 large motors for steering. 2 medium motors for attachments. 2 colour sensors for picking up the white and black lines, also used for line squaring. 1 gyro sensor. To enable attachments to be changed as quickly as possible we're using gravity to keep the gears connected, i.e. you don't need to fasten anything to the robot. Every attachment has 2x 12 tooth double bevel gear (part 32270) which comes in contact with the 2x 20 tooth double bevel gears (part 32269) on the robot. The medium motors are horizontally aligned on the robots, but we use 12 tooth double bevel gears to convert that to vertical alignments. These in turn are connected to 20 tooth double bevel gears, and the attachments in turn connect to these 20 tooth double bevel gears with their 12 tooth double bevel gears. The complete robot is modelled in Bricklink Studio 2 . You can download the rob...
Hyper-V Server 2012 is a free edition of Server 2012 with fully functional Hyper-V capabilities. It excludes the GUI from the server edition, but you can administer the box from any external computer running Windows 7 or higher. It’s also possible to enable file sharing, implying the server can act as a backup machine. In addition it’s possible to install third party software which will give you a GUI-like experience at no cost.
First you need the Hyper-V 2012 ISO which can be downloaded at https://www.microsoft.com/en-us/evalcenter/evaluate-hyper-v-server-2012-r2. You’ll need to register before you can download. After downloading you’ll need to write this ISO either to a DVD or USB drive. For both options you can use the Windows USB/DVD download tool available at https://www.microsoft.com/en-us/download/windows-usb-dvd-download-tool.
Boot your server with this ISO and you’ll get the following screen:


When done it will restart. After restart it will continue the installation process and it will ask you to change the Administrator password. Click OK and provide the password. Once done you’ll get the following screen:

First choose option 1 & 2 to set the workgroup and computer name. In this case I’ll leave the workgroup and only change the computer name to hyperv2012.

There's not need to restart the box now. Add a local administrator using option 3. The easiest solution is to add a user with exactly the same username and password as on the PC that will be used to admin this box.
Then enable remote desktop using option 7:

Install-WindowsFeature -name File-Services
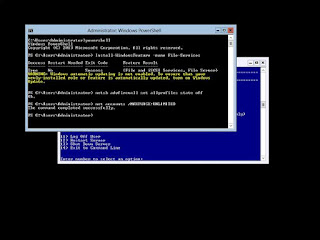
Then execute the following 2 commands to disable the firewall and disable password expiry dates:
netsh advfirewall set allprofiles state off
net accounts /MAXPWAGE:UNLIMITED


First you need the Hyper-V 2012 ISO which can be downloaded at https://www.microsoft.com/en-us/evalcenter/evaluate-hyper-v-server-2012-r2. You’ll need to register before you can download. After downloading you’ll need to write this ISO either to a DVD or USB drive. For both options you can use the Windows USB/DVD download tool available at https://www.microsoft.com/en-us/download/windows-usb-dvd-download-tool.
Boot your server with this ISO and you’ll get the following screen:

Click Next and on Install Now. You’ll have to accept the license terms. Then choose the Custom: Install the newer version of Hyper-V only (advanced). Choose your destination drive and click on Next. This will install Hyper-V on your machine:

When done it will restart. After restart it will continue the installation process and it will ask you to change the Administrator password. Click OK and provide the password. Once done you’ll get the following screen:

This is the standard HyperV 2012 Core interface.
First choose option 1 & 2 to set the workgroup and computer name. In this case I’ll leave the workgroup and only change the computer name to hyperv2012.

Then enable remote desktop using option 7:

Install-WindowsFeature -name File-Services
Then execute the following 2 commands to disable the firewall and disable password expiry dates:
netsh advfirewall set allprofiles state off
net accounts /MAXPWAGE:UNLIMITED

Now restart your server for changes to take effect. After restart log in with your new user account. Normally you can remote desktop to the box by using the server name only, but it that fails use option 8 from the menu to get the IP address and use the IP address instead. Using Remote Desktop you should get the same screen as what you've seen on the console, implying you can now admin this box remotely.
You should also be able to browse to the network share C$ on this box from a remote client:

Using this network link you can copy files to the server so we can install extra utilities.
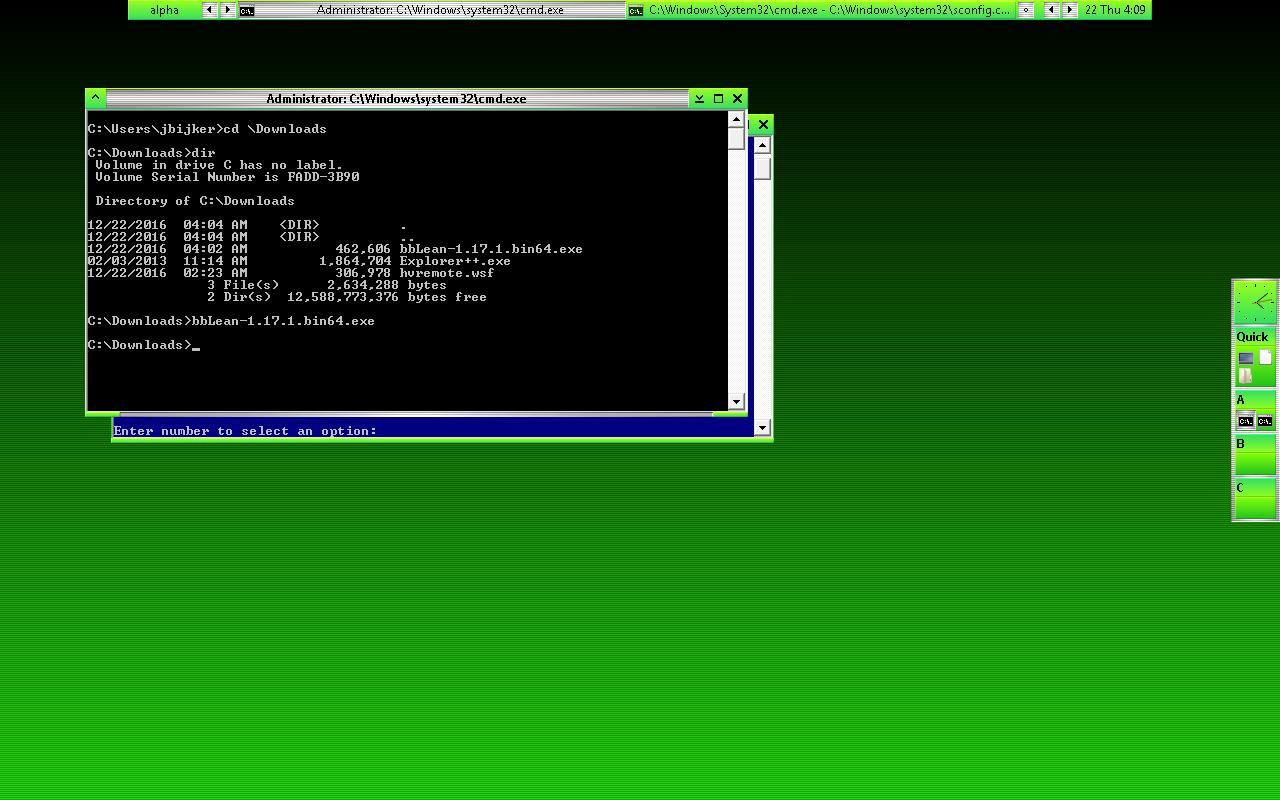
First download the 64-bit versions of bbLean from http://bb4win.sourceforge.net/bblean/ and Explorer++ from https://explorerplusplus.com/. Copy both to your server.
bbLean is the window manager to give us a better GUI interface, and Explorer++ will give you a Explorer-like interface. From a command prompt simply run the file you've downloaded to install. In my case I've used the default destination directory of c:\bbLean. After installation click "Start".
Right-click anywhere on the desktop and choose Blackbox - Configuration - Plugins- Load/Unload. Deselect the following plugins:
- bbKeys
- bbLeanSkin
- bbAnalog
- bbIconBox
- bbColor3dc
Right-click again anywhere on the desktop and choose Styles - 3colours - blue.
Next copy the explorer executable to c:\Windows\explorer.exe.
Now when you right-click on the desktop and choose "Explorer" you'll get an Explorer-type window allowing you to browse and copy files:

To automatically launch bbLean at startup you need to add a registry entry. Type regedit from the command prompt, then browse to HKEY_LOCAL_MACHINE\SOFTWARE\Microsoft\Windows\CurrentVersion\Run. Add a new string value with name set to "bbLean" and value to "c:\bbLean\blackbox.exe -nostartup". The nostartup parameter is there to instruct bbLean not to run any startup commands defined in the registry - because they would've been run by the native GUI and there's no need to run them again.
You can also install a web browser directly on the server, making it ideal to kick off downloads. Download the installer at https://www.mozilla.org/en-US/firefox/new/, then copy it over to your server and install it there. For some reason Chrome doesn't work.
Other utilities I normally install:
- Putty: http://www.chiark.greenend.org.uk/~sgtatham/putty/download.html
Use to connect to linux VMs - WinSCP: https://winscp.net/eng/download.php
Use to copy data from/to linux VMs - HV Manager: https://www.apreltech.com/HvManager
Gives you a basic web interface allowing start/stop of VMs on the box. For security reasons set it to run only on the localhost interface, meaning you can only access it from the box itself, not from ay network. For adding new VMs or changing the configuration you need to use the Hyper-V Management Tools on another computer - or even on a VM on the box itself.
Comments